
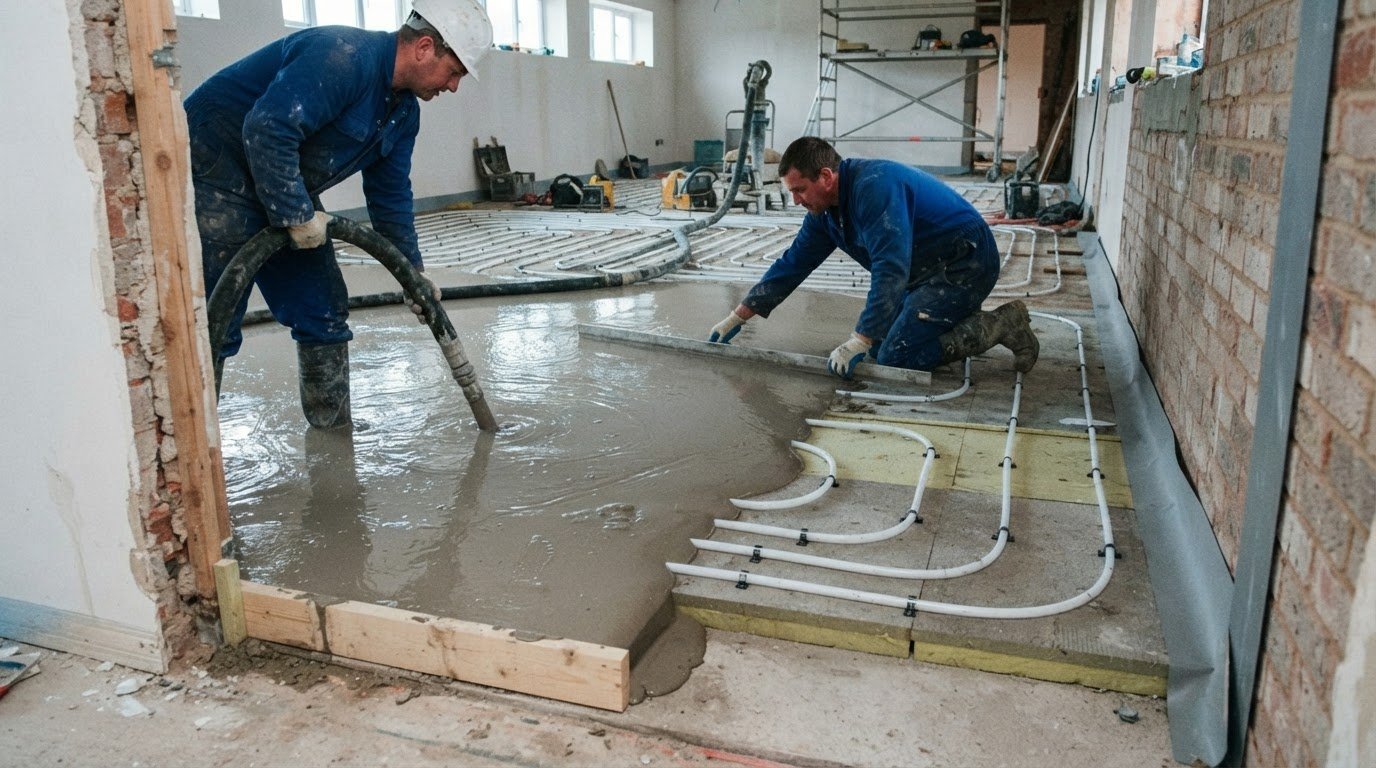
Commercial screeding over underfloor heating is not a one-depth-fits-all detail. Floating sand-and-cement screed typically starts at 75 mm total depth for commercial work, while liquid screed can be laid at around 50 mm in many projects. The right specification depends on the screed material, pipe cover, floor loads and system design.
Choosing the screed depth affects more than the finished floor level. It also influences heat transfer and how quickly the system responds. This guide explains how to plan screed cover over heating pipes, compare liquid and sand-and-cement options, and account for heating cables, floor finishes, insulation and movement joints when designing screeding over underfloor heating in commercial buildings.
Key Takeaways
- Match electric heating cables to a screed system designed for them, as incompatible installations can risk thermal shock and cracking.
- Compare liquid and sand-and-cement screeds by considering pipe cover, floor loading and the planned floor finish.
- Understand how screed thickness and thermal conductivity influence heat transfer and how quickly the floor responds.
- Factor in secure pipe fixing, movement joints and the heating system’s layout when planning a durable commercial floor.
Compatibility of electric heating cables with floor screed
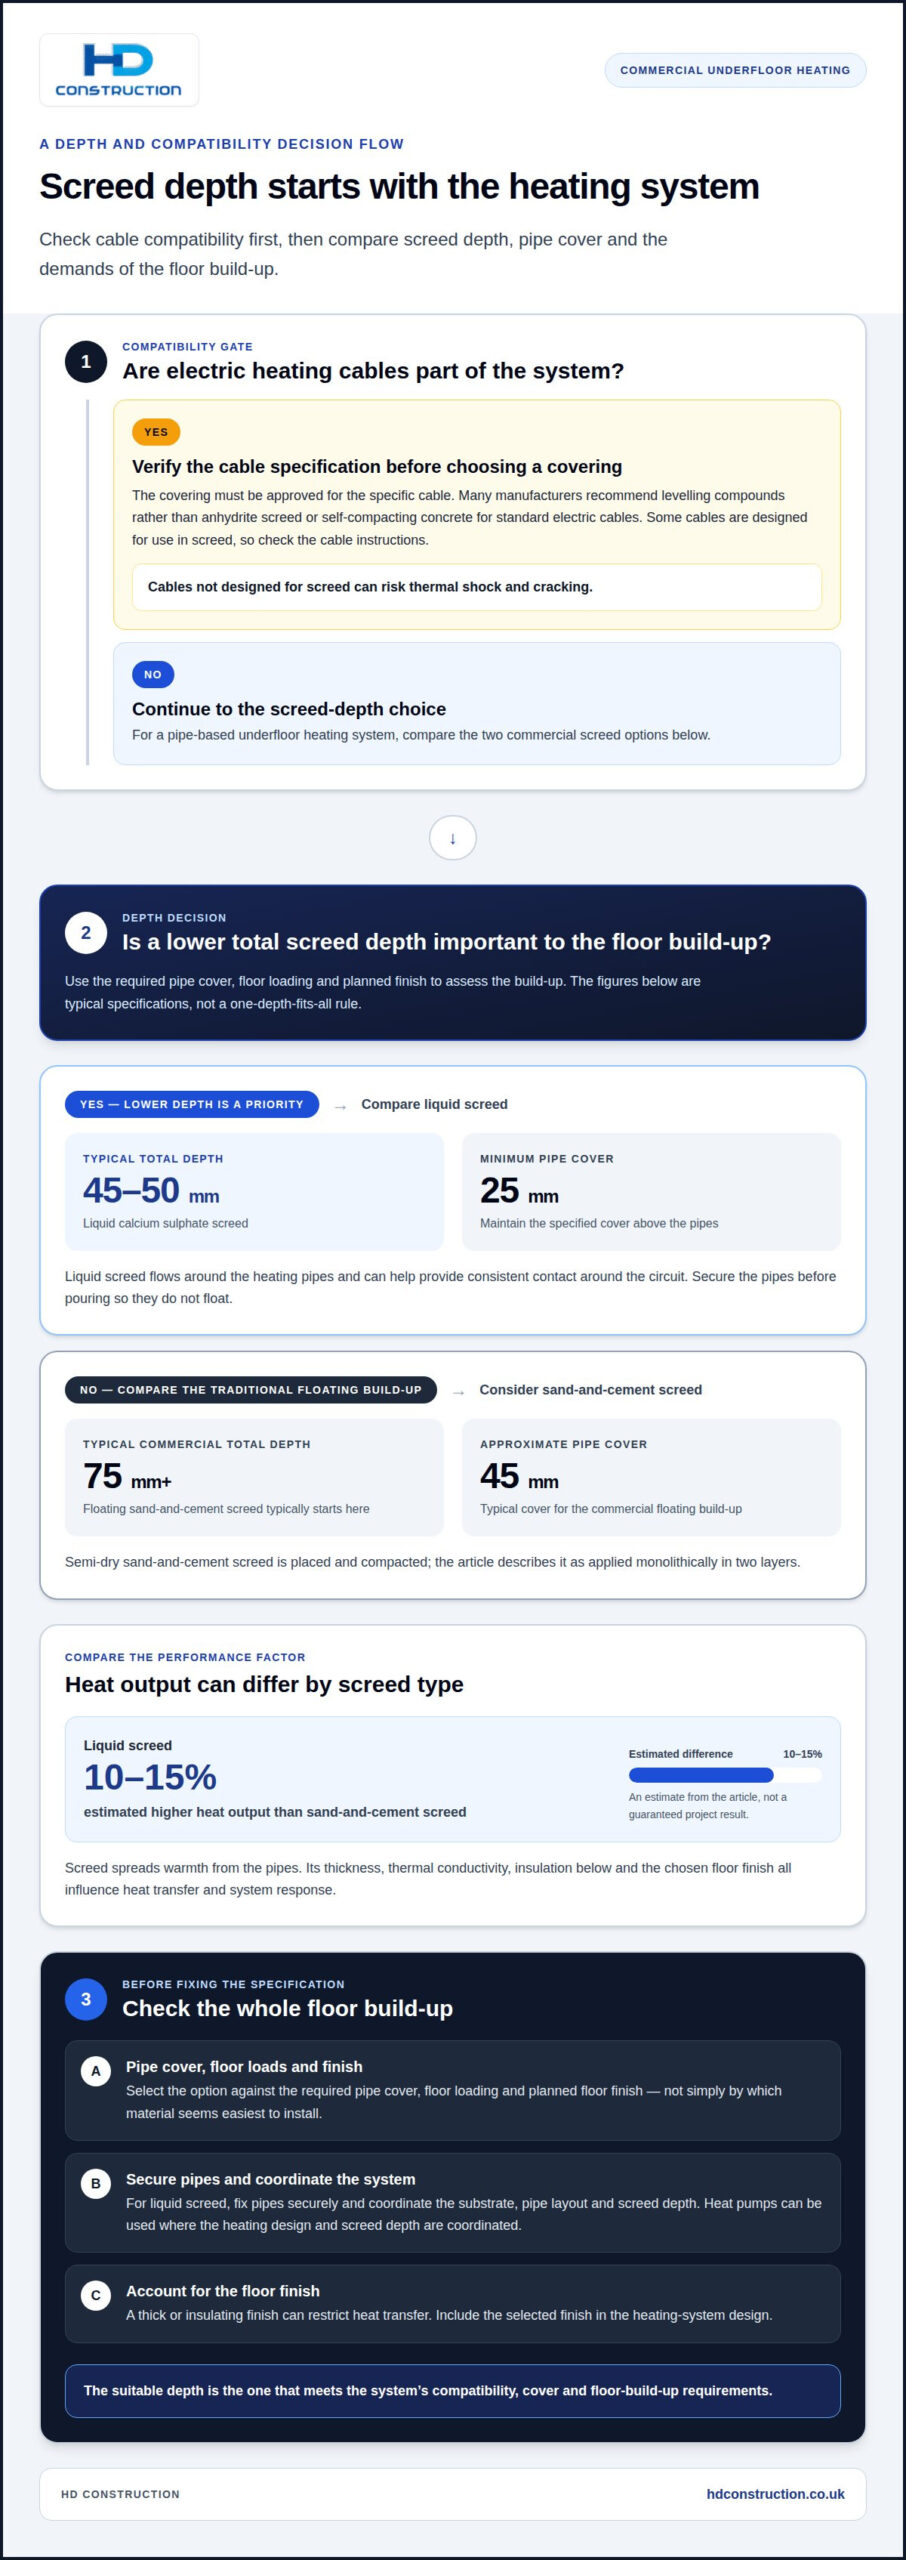
Electric heating cables need a covering approved for the specific system. Many manufacturers recommend levelling compounds rather than anhydrite screed or self-compacting concrete for standard electric cables. Some cables are designed for use in floor screed, including self-compacting concrete, so follow the cable specification to confirm compatibility. Using cables not designed for screed can cause thermal shock and cracking.
Weber FloorFlex is one levelling-compound option, but its suitability depends on the cable and product instructions. Check that the specified layer, application method and temperature limits match the heating system. A thinner screed can reduce structural load compared with a traditional heavier screed, especially on first floors, timber joist floors and steel-frame floors. The complete floor build-up must still suit its support and intended use.
The floor finish also affects heat output. Vinyl coverings have a stated heat-output limit of 75 W/m² for the listed flow temperatures. With a 2 tog carpet and underlay, listed outputs are 39, 50, 61 and 72 W/m² at flow temperatures of 40°C, 45°C, 50°C and 55°C. A thick or insulating finish can restrict heat transfer, so include the chosen finish in system design.
Drying time depends on screed type and depth. Hand-mixed screed follows one day per millimetre for the first 50 mm, then two days per millimetre above that. A 65 mm example gives 80 days; four weeks is a practical minimum, not a substitute for moisture testing. Some fast-drying screeds cure within 3-7 days, subject to the manufacturer’s instructions.
Allow screed to cure and gain strength before commissioning. Start at 20°C, increase by no more than 5°C per day, and do not exceed 55°C. Before fitting the floor finish, test screed moisture and prepare a clean, level surface; confirm the finish and its adhesive suit heated screed. Follow the screed manufacturer’s specified drying and commissioning process.
Liquid or sand and cement over underfloor heating?
Commercial underfloor heating systems can use liquid calcium sulphate or sand-and-cement screed. The choice affects the overall depth, pipe cover, installation method and how the floor responds to heat.
Comparing Screed Options
Liquid screed flows around heating pipes, while semi-dry sand-and-cement screed is placed and compacted. Both can form a heated floor, but their depths and application differ. Liquid calcium sulphate screed typically has a total depth of 45 to 50 mm, with at least 25 mm covering the pipes. Floating sand-and-cement screed typically starts at 75 mm for commercial work, with about 45 mm of pipe cover.
Semi-dry screed is applied monolithically in two layers. Choose the option based on the required pipe cover, floor loading and planned finish, rather than simply on which material seems easiest to install.
Liquid Screed Installation
Liquid flowing screed is poured over the prepared floor and flows around the pipes to create an even surface. Its levelling properties can help provide consistent contact around the heating circuit, supporting heat transfer through the screed.
Before installation, fix the heating pipes securely so they do not float when the liquid screed is placed. The floor build-up must provide the required pipe cover and suit the final finish. A liquid system may also work for projects using heat pumps, provided the heating design and screed depth are coordinated.
Pumped Liquid Screed
Pumped liquid screed is delivered through a hose, rather than moved and spread solely by hand. This method can support installation across large commercial floor plates and help distribute material efficiently between prepared zones.
Coordinate the substrate, pipe layout and access route before pumping begins. Keep pipes fixed in position and ensure the liquid reaches around the circuit without leaving unfilled areas. These steps help achieve a level surface and consistent coverage across the heated floor.
Suitable Screeds for Commercial Heating
Both liquid and sand-and-cement screeds can be suitable for commercial underfloor heating when their specification matches the system. Liquid calcium sulphate typically uses 45 to 50 mm total depth; floating cement screed commonly starts at 75 mm in commercial work.
Before selecting the floor build-up, compare the required pipe cover, floor loads, installation conditions and finish compatibility. Heat pumps and other system components must also work with the chosen screed design, so heat distribution and floor construction remain aligned.
Thermal conductivity and heat distribution
Heating pipes transfer energy into the surrounding screed, which spreads warmth across the floor. Screed fills gaps around the pipes, reducing air pockets that can disrupt thermal exchange. Liquid screed is estimated to provide 10-15% more heat output than sand-and-cement screed. That difference can influence the heating design, particularly where floors need to deliver steady warmth across large areas.
Floor finish and flow temperature affect the heat reaching occupied spaces. With natural stone or tiles over sand-and-cement screed, listed output is 66 W/m² at 40°C and 85 W/m² at 45°C. At 50°C, the calculated figure is 104 W/m², subject to a 100 W/m² limit. At 55°C, the calculated figure is 124 W/m², also subject to that limit. These examples show why output figures must be considered alongside system limits.
Heat pumps work with underfloor heating at lower temperatures than radiators typically require. Underfloor heating commonly operates at 35-45°C, compared with 60°C or more for radiators. Screed performance therefore depends on heat transfer through the floor, suitable insulation below it and the selected finish above it. High-performance screed paired with underfloor heating can reduce energy use in new homes by up to 25%.
Thickness changes thermal mass and response time. A thinner screed can let heat travel evenly from the heating pipes to the floor, while its lower thermal mass can help the system respond faster. Thin underfloor-heating screed can be laid as little as 20 mm over the pipes. That option needs to suit the floor’s strength, pipe cover and finish; extra depth can make the system work harder before the floor warms. The typical specification balances heat output with structural and project requirements.
Underfloor heating system and screed design
Commercial floor design needs to coordinate the heating system, screed depth, insulation and loading. Treating these as separate decisions can compromise heat output, drying and floor performance. For commercial screeding over underfloor heating, plan the floor build-up alongside the heating layout and the intended use of each space.
For new homes, UK Building Regulations Part L requires high-performance insulation. Screed and heating specifications also need to follow the selected system’s requirements and account for the floor finish. The design must balance heat delivery with structural strength, rather than adding depth without considering its effect.
Start with the heating layout. Pipe spacing, circuit boundaries and independently controlled zones affect how heat spreads across the floor. Consider movement joints between adjacent screeds serving separate heating circuits and between heated and unheated areas. Align joints with structural breaks and fixed features such as columns and walls, allowing for movement throughout the floor build-up.
Insulation below the heated layer limits downward heat loss. For floors over heated areas, the stated recommendation is 30 mm of PIR insulation or an equivalent. Boards need to lie flat without movement, while heating pipes must be secured before the screed is placed. These details help maintain the designed cover and support even heat transfer.
Specify the screed according to the room’s use, floor area, point loading and chosen finish. A large open floor and a room divided by structural features place different demands on joint layout and heating control. Fibre reinforcement can help reduce shrinkage cracks, but it does not replace appropriate jointing or curing. With sand-and-cement screed, allow it to cure before gradually applying heat; the commissioning sequence helps protect the floor as it gains strength. Commercial screeding over underfloor heating works best when these details are coordinated as one floor system.
For a project-specific commercial screeding discussion, discuss your floor build-up.
HD Construction: Screeding
HD Construction provides screeding for commercial projects where underfloor heating, floor loading and the final finish need to be considered together. Include the screed package in floor-build-up planning so the material, depth, pipe cover and joint layout can be coordinated.
This approach is useful when a commercial fit-out needs a level, durable base above a heating system, or when floor construction must align with adjacent works. HD Construction also provides Drylining, Plastering and SFS (Steel Framing System) for projects combining floor and interior packages.
Share your project scope and floor requirements with HD Construction to discuss the screeding work. Contact HD Construction to talk through your project.
Plan the next stage with confidence
For commercial projects involving screeding over underfloor heating, treat the floor build-up as part of the wider construction programme. A clear brief brings together the intended use, heating layout, floor finish and structural constraints, helping the project team coordinate decisions before installation. It also places the screeding scope alongside related interior works.
HD Construction provides Screeding, Drylining, Plastering and SFS (Steel Framing System) for commercial projects that need coordinated building work. Share your project requirements and intended floor build-up to begin a focused discussion about the next stage.
Contact HD Construction to discuss your project and move forward with a clearly planned floor package.
Frequently Asked Questions
How much screed do I need over underfloor heating pipes?
For commercial floating sand-and-cement screed, allow a typical total depth starting at 75 mm, with about 45 mm covering the pipes. Liquid calcium sulphate screed typically has a total depth of 45 to 50 mm and needs at least 25 mm of pipe cover. Treat these as different build-ups: total depth includes the pipe zone, while cover measures screed above the pipe.
Why has my heated screed cracked?
Cracking can result from movement, shrinkage, poor curing or a mismatch between electric heating and screed. Cables not designed for screed, for example, can cause thermal shock. Missing or poorly positioned movement joints can also leave the floor unable to accommodate movement. Fibre reinforcement may help control shrinkage, but it cannot replace suitable jointing, securely fixed pipes and managed curing.
What screed thickness is required over commercial underfloor heating pipes?
Floating sand-and-cement screed over commercial underfloor heating typically starts at 75 mm total depth, with around 45 mm above the pipes. Liquid calcium sulphate systems typically use 45 to 50 mm total depth and require at least 25 mm of cover. The specified build-up also needs to account for floor loading, heating output and the intended floor finish.
How should commercial underfloor heating screed be installed and cured?
Prepare a stable base, lay insulation flat and secure the heating pipes before placing screed. For flowing screed, firm pipe fixing helps prevent movement or floating during the pour. Sand-and-cement screed should cure for at least 21 days before heat is applied. Then commission gradually, following the screed manufacturer’s instructions, and test moisture before installing the final covering.
What are the differences between cement, anhydrite and flowing screeds for commercial underfloor heating?
Sand-and-cement screed is a semi-dry mix that is placed and compacted; floating commercial installations typically start at 75 mm total depth. Anhydrite is calcium sulphate, commonly supplied as a liquid screed, and typically uses a 45 to 50 mm total depth. “Flowing” describes how the material is placed and levels, rather than identifying one specific screed chemistry.
What are common risks and defects when screeding over underfloor heating, and how can they be prevented?
Common problems include cracks, uneven coverage, trapped air and moisture-related failures in the floor finish. Secure pipes so they cannot shift during placement, and plan movement joints around circuits, structural breaks and transitions between heated and unheated areas. Allow the screed to cure and dry before commissioning the heating or fitting finishes. Moisture testing helps reduce the risk of warped boards, bubbled vinyl and adhesive failure.